One of WordPress’ biggest strengths is its intuitive, beginner-friendly design; even users with little or no web development experience can get the basics up and running and even, with the right theme, add some of your own customization. There’s still a few peculiarities that can throw new users for a loop, but getting started is easy, even if you’re unwilling to have a gander at the WordPress Codex (and you’d be surprised at how many people try to ‘wing it’ when it comes to working with new software!). The WordPress Customizer is a great example of this user-friendly functionality. Originally added in WordPress 3.4, which was released back in June 2012, the core options and functions in the Customizer have been improved and expanded since then to make it a solid choice for developers wanting to give their users more direct control over a theme. In this article, we’ll look at the Customizer, what it does, how it works, and why we think it’s something worth using.
What is the WordPress Customizer
If you’ve been running a WordPress site for a while it may be the case that you’ve never even opened the Customizer; if you’ve got everything in its place on your site then there’s not much of a reason to be rocking the boat. For those not in the know, the Customizer provides access to a theme’s options with the addition of a real-time preview viewport so you can see the effects of any setting changes before they’re saved. It’s a real benefit for casual users to add a bit of a personal touch to their site.
What can it do?
Of course, this benefit only applies if the theme developers saw fit to build the options into the Customizer. In a theme where the developer uses their own framework, or pack their theme options into a separate dashboard menu item, then you’re just left just with the basic options that WordPress includes by default. You’ll still be able to open the Customizer, but the only options will be things like setting up widgets in the available areas of your theme, assigning menus, or changing to a static frontpage. Not that this isn’t convenient; setting up widgets with a live preview as you make changes to the options is great, especially with more robust widgets like News Show Pro. However, not all widgets can support the live preview; things like WooCommerce widgets need additional data before they can be displayed so you’ll have to close then reopen the Customizer to see such changes. Once theme developers get their hands on it though, it’s a whole different story. Core theme settings can be woven into the Customizer to bring a heap of new options to bolster the default; we’ll have a look at this in one of our themes later, but first, let’s look at how the Customizer is used.
How to use the WordPress Customizer
As you might imagine, since the Customizer’s intention is to make theme modification easy it’s fairly intuitive to use, but it’s worth getting acquainted with the core functionality so you don’t get caught out when using a theme with more complex options. We’ll look at the default WordPress Twenty-Fifteen theme, since it doesn’t go crazy with options but still has some extras outside the default. Once the basic WordPress package is installed and the Twenty-Fifteen theme activated we’re left with a basic website with the standard sample data installed; let’s open the Customizer by navigating to Appearance → Customize in the WordPress dashboard. Once the Customizer opens we can see that there’s the preview viewport on the right, and the list of available options in the left sidebar.
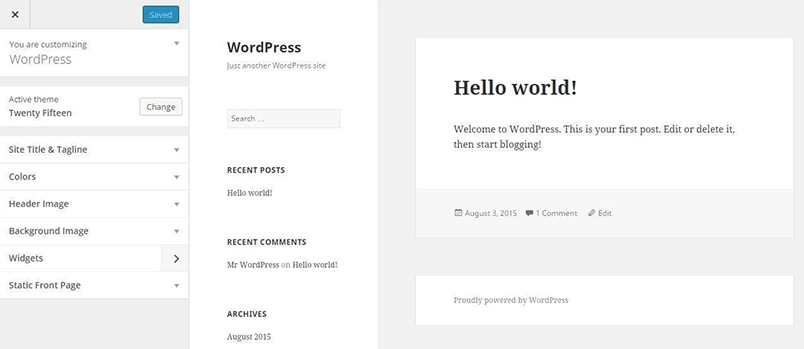
These options aren’t actually options; they’re what the Codex refers to as "Panels", and each one is meant to represent a particular section. Think of this as something like the WordPress Dashboard, which has the links to each of the relevant sections in the left menu. When an option panel is clicked, it expands to show the available settings; for posterity’s sake the expanded area is referred to as a Section in the codex, and each option as a Setting or Control. The Twenty-Fifteen theme has a total of seven panels, some of which are default settings you’ll find in any theme regardless of whether their options have been integrated into the Customizer or not, and others that are theme-specific:
- Site Title & Tagline – A default area where you can set the…site title & tagline. Who’d have thought? Also allows for the title to be displayed or not.
- Colors – Here you can change site colours using a useful colour picker. Each area appears as a separate option to allow for a mix of colors, and there’s an option that allows you to select from some preset color schemes; quite useful if you’re not too hot on the design front!
- Header Image – This theme-specific section is extremely straightforward, with just one option for changing the image in the header. It’s a little bit misleading though, since it’s only a header image if you’re on a smaller screen; on desktops the image appears in the sidebar. Something to note here is that this image will replace the sidebar background color selected in the Colors panel; options often overlap in this way.
- Background Image – I don’t know what this option does. It’s too enigmatic.
- Navigation – This is a default section that includes the options for assigning menus to the allocated areas of the theme; Twenty-Fifteen uses a Primary menu and a Social Links menu, but this of course will change for each theme.
-
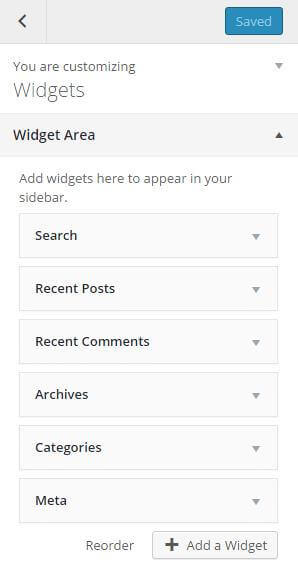
![The widget panel as seen in the customizer for the twenty-fifteen wordpress theme]() Widgets – Another default section where you can assign new widgets. Unlike the other sections the panel link has a right bracket icon rather than a down arrow icon; this is because instead of opening a Section when the panel is clicked, it instead switches to a new sidebar view that lists each of the available widget positions as a separate panel where you can add or modify widgets:
Widgets – Another default section where you can assign new widgets. Unlike the other sections the panel link has a right bracket icon rather than a down arrow icon; this is because instead of opening a Section when the panel is clicked, it instead switches to a new sidebar view that lists each of the available widget positions as a separate panel where you can add or modify widgets:
There’s only one widget area in this theme though, so it looks like overkill. But trust me; if your theme has a ton of widget areas this separate bar is a godsend.
- Static Front Page – Another default option where you can set a static frontpage instead of a list of posts, and set a separate posts page; essentially just the core options from the Reading Settings area of the dashboard.
In each of these panels are the various settings, or controls, which you can modify as you see fit. The Customizer API is very flexible in how these controls can be applied, so that developers with the appropriate super-duper-WordPress-development skills can offer a full range of logical control layouts. Even the fairly basic options in Twenty-Fifteen go through a range of different looks; toggles to turn an option on or off, drop-down lists to choose a preset color scheme, buttons that open the media library to select an image; there’s a lot of ways for developers to make their options more intuitive.
One of the best ways to see how the Customizer works with the live preview is to modify the Colors section; select to change the background color, and every time a new color is selected in the color picker you’ll immediately see the change in the relevant section of the website:
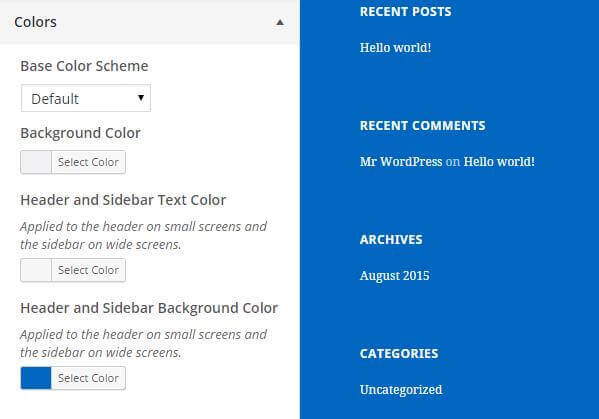
There is something that needs to be taken into account when changing these options however; none of the changes are saved until the Save & Publish button at the top of the left sidebar is clicked. This feels particularly strange when adding widgets; instead of a Save button in the widget options, there’s just a Close button, and the Save & Publish button must be clicked to save the widget changes.
What other options can the Customizer include?
Even a basic theme for blogging such as Twenty-Fifteen can pack a few interesting options into it, but how far can these options go? For a comparison, let’s look at our latest WordPress theme, Villa Bellucci, to see what it has to offer.
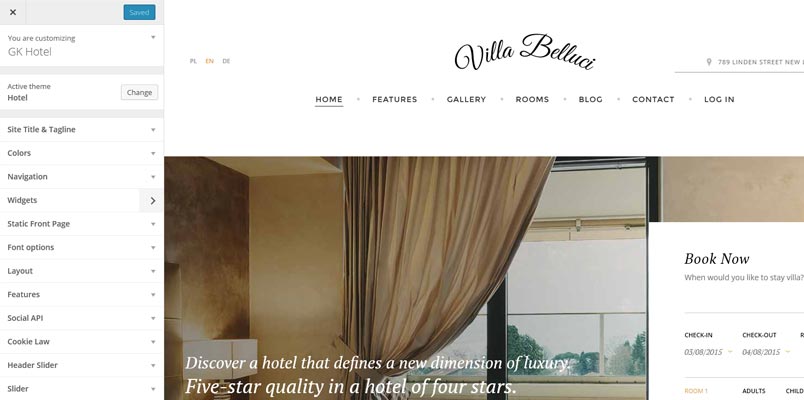
As you can see, there’s now twelve option panels compared to the seven of Twenty-Fifteen, so already there’s an increase. But it goes even further than that; compare the panel names. In Twenty-Fifteen they often provide a single purpose that’s clear from the name, but in Villa Belluci the naming is more general. This is because when you open most of the panels there are more options available; even the default areas can be expanded. For example, the Navigation panel usually contains the options for assigning menus, but since Villa Belluci includes two menu types (a Classic menu and an Aside menu) there is also a toggle to enable or disable the Classic menu; disabling will default to the Aside menu.
Of course, that’s just one extra option. But if we look in one of the new areas, such as Features, there’s some fairly unique settings, like:
- Use Scroll Reveal – Enables or disables use of the Scroll Reveal JavaScript library; you’ll often see this used in our themes to add animations to HTML elements.
- Read More Button on Categories – This option adds a "More" link underneath each post in the category post list.
- Copyright Text – HTML entered here will appear in the copyright area in the footer of each page.
Some additional options are very simple toggles, whilst others control some more complex settings like disabling features or adding content. It’s also possible to limit the appearance of particular panels until certain conditions are met; in Villa Belluci there are two interesting instances that demonstrate this ability, one based on options, and another based on the viewport. First are the Menu widget areas. When a website uses the aside menu in Villa Belluci instead of the Classic menu, two new widget areas will appear in the Customizer’s widgets panel; one above and one below the menu options called Menu Top and Menu Bottom respectively. This prevents users from attaching widgets to widget areas that are not visible on the site. What’s interesting about this is that the widget areas in question are always available if you go to the Appearance → Widgets area of the WordPress dashboard; they just don’t appear in the Customizer unless the aside menu is enabled.
The second example of a controlled input is with the contact page options. Villa Belluci includes a contact page with a map, contact form and some plain text.
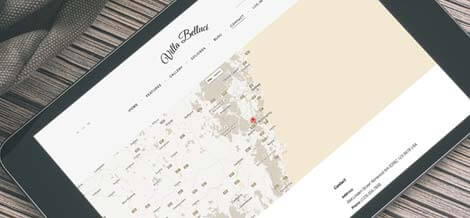
The majority of the contact page is created just by making a new page, assigning the Contact Page template, then using a shortcode to create the form and some custom HTML for the text, pretty much like any other page. But for the map, rather than having users fiddle with another shortcode or HTML, the options have just been built into the Customizer, with options for enabling/disabling the map, setting the map zoom, and the longitude/latitude position to center the map appropriately. To prevent confusion, the Contact Page panel in the Customizer is hidden by default, but when the viewport on the right of the Customizer page is on a page with the Contact Page template assigned, it will automatically add the right panel into the sidebar, ready for the options to be assigned.
So not only can a developer build some pretty darn complex options into their theme, it’s also possible for them to protect or hide unnecessary options, helping new users get to grips with the available customization settings easily.
Why do we use the Customizer for our theme options?
As many of you may be aware, last year we started using the Customizer for all our theme-specific settings, rather than relying on our own GavernWP theme framework as we had done since we first started developing WordPress themes. Why did we make this change? There’s quite a few reasons.
Probably the most important reason is that we want our themes to be as easy-to-use as possible. The GavernWP framework was complex and capable of providing solid, useful features, but when a large number of these options can be replicated in the Customizer along with a real-time preview of each option as it’s changed, it’s easy to see the benefits of switching; plus the ability to show or hide options or widget areas, as demonstrated in Villa Belluci, really helps the Customizer become even more beginner-friendly. It also allows users to enjoy a centralized hub for changing settings; instead of jumping between multiple sections in the admin area to match our demo layout, every option, from setting the static page to placing and configuring widgets, can be completed from the Customizer (importing demo content is still separate, but you never know what the future of WordPress development will bring!). Another reason for changing is the greater integration with WordPress as the Customizer develops; new capabilities and features are being added to the Customizer as time goes on which we are able to take advantage of with our themes. for example, version 4.3 of WordPress will introduce the ability to create and modify menus when it releases in August 2015, and there’s sure to be even more integration as time goes on.
Basically, it all boils down to providing what the customer needs; with the Customizer beginners get to make core changes to their website without getting into the coding side of things, while people with more technical skills can still modify CSS via our override file or make changes in the core PHP and CSS file as needed, something that’s not so easy when you’re still getting the hang of plain HTML! Have you found any interesting options in your themes, or have an option you’d like to see integrated in our future theme releases? Leave a comment below and we’ll make sure to pass it onto our development team to have a look at.
The post The WordPress Customizer; what it is, and why we use it in our themes appeared first on GavickPro Documentation.
 Widgets – Another default section where you can assign new widgets. Unlike the other sections the panel link has a right bracket icon rather than a down arrow icon; this is because instead of opening a Section when the panel is clicked, it instead switches to a new sidebar view that lists each of the available widget positions as a separate panel where you can add or modify widgets:


